2019年12月16日星期一

Use Toucan backup tools sync/backup for folders one by one!


Setup Sync Jobs in the Toucan for each folder first.


And then setup the script in Toucan


sync("folder backup 1")

sync("folder backup 2")
sync("folder backup 3")


This pic. show you the sync job is "A" & "B"


And then run this cmmand in the command prompt in the location of the toucan:


*myscriptname is the script name setup in the Toucan already. The picture is show the script is "backup"


toucan --script="dofile(getscript([[myscriptname]]))" --log="drive:/folder/log.txt"


The command something

toucan --script="dofile(getscript([[backup]]))" --log="c:/log.txt"

This will run the jobs one by one and have a log file for that operation.


----------------------------------------------------------------------------------------------------------
If you want to do the jobs at the same time. You can use this command as below:
toucan -j "folder backup 1"
toucan -j "folder backup 2"
toucan -j "folder backup 3"
.
.
.
.


God bless you!

2019年11月25日星期一

HP RAID checking include smart array

downlaod HP Linux system tools include RAID rpm


HPACUCLI

https://support.hpe.com/hpsc/swd/public/detail?swItemId=MTX_d6ebba0f5cd642edace4648b9a
HPSSACLI
https://support.hpe.com/hpsc/swd/public/detail?swItemId=MTX_04bffb688a73438598fef81ddd
HPLOG rpm or hp-health rpm
https://support.hpe.com/hpsc/swd/public/detail?swItemId=MTX_7e21c564092e40688fc445a3c4

WEBMIN Module

HP SmartArray and HP Server Reporter 2.0

Description If you have an HP server machine (I administer an HP Proliant ML350 Gen9 Server) this is definitely the right module for you. This is just a module that prints the output of the commands of the Management Component Pack that you should download and ins

Download hpsmartarray.wbm.gz
Website http://www.superlinux.net
Author Katya Ahmad
Last updated 2019-10-02 12:06:06


Use SMARTCTL check DRIVE via HP hardware RAID CARD


To look at disks behind HP Smart Array controllers, use syntax such as:

smartctl -a -d cciss,0 /dev/cciss/c0d0 (cciss driver under Linux)
smartctl -a -d cciss,0 /dev/sg1 (hpsa or hpahcisr drivers under Linux)

check the first drive cciss,0

smartctl -a -d cciss,0 /dev/sg1

cciss,0 is the first

cciss,1 is the second
.

or visit https://www.centos.org/forums/viewtopic.php?t=55506

Guide to installing HP System Management Tools CentOS 7

Add a file /etc/yum.repos.d/hp.repo with this info inside.

----------------------------------------------------------------------------------------
[HP-spp]
name=HP Service Pack for ProLiant
baseurl=http://downloads.linux.hpe.com/SDR/repo/spp/RHEL/7.2/x86_64/current/
enabled=1
gpgcheck=0
gpgkey=file:///etc/pki/rpm-gpg/GPG-KEY-ssp

[HP-mcp]

name=HP Management Component Pack for ProLiant
baseurl=http://downloads.linux.hpe.com/SDR/repo/mcp/centos/7.3/x86_64/current/
enabled=1
gpgcheck=0
gpgkey=file:///etc/pki/rpm-gpg/GPG-KEY-mcp
----------------------------------------------------------------------------------------
And get the GPG keys
http://downloads.linux.hpe.com/SDR/repo/spp/GPG-KEY-spp
and
http://downloads.linux.hpe.com/SDR/repo/mcp/GPG-KEY-mcp

Place them in /etc/pki/rpm-gpg/


After that you can install the things via yum

sudo yum install hp-health hpssacli hp-snmp-agents hpssa hpssacli hp-smh-templates hpsmh hponcfg

HP System Management Homepage uses SNMP to monitor the system heath


Change config use this command

/opt/hp/hpsmh/sbin/hpsnmpconfig


.

.

2019年8月21日星期三

Windows 10 , Word or Excel 開啟NAS檔案,出現 ”目錄名稱無效” 的錯誤


控制台- 程式集- 程式和功能- 開啟或關閉windows功能

關鍵是「SMB/CIFS 1.0用戶端」設定,只要將此選
項打勾,重開機後即可解決問題。

願主耶穌賜福給大家!

2019年7月5日星期五

Manual use YUM to install SETUP command on Centos minimal installation

Centos minimal install.

Manual use YUM to install SETUP command

$ yum install -y setuptool ntsysv system-config-*
After install complete then
$ setup

2019年1月28日星期一

Enable SMB 1.0/CIFS File Sharing Support (It will help the printer & linux access Win10 SMB share)

  1. Click and open the Search Bar in Windows 10
    Type Windows Features in the search bar
    Double Click Turn Windows Features off and On
  2. Scroll down to SMB 1.0/CIFS File Sharing Support
  3. Check the box net toSMB 1.0/CIFS File Sharing Support 
    Click OK to accept the changes
  4. Restart your win10 computer


  1. 控制台
  2. 程式集
  3. 開啟或關閉WINDOWS功能
  4. 捲下並找出SMB 1.0/CIFS File Sharing Support
  5. 選擇使用

6.重啟電腦

2019年1月16日星期三

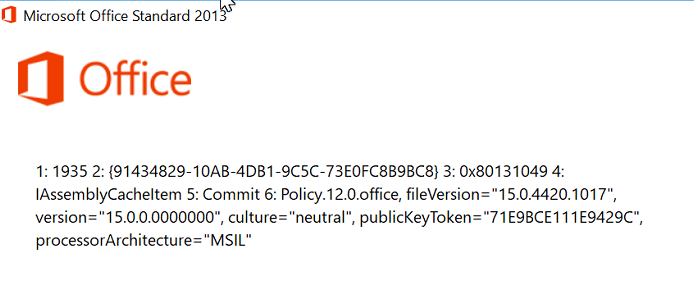
Install Office 2016 encounter error 1935 on brand new PC(Lenovo/HP/Dell)

Fix link from microsoft
https://docs.microsoft.com/en-us/dotnet/framework/install/repair

download the NetFxRepairTools.exe

Error similar to this!

Image